Persisting Data in Docker
1 Introduction
In the article First Experience with Docker, we introduced the basic concept of Docker. Later, we shared how to successfully run Docker in Win10 and use GitHub Action to automatically build and push Docker images. Friends who have tried it should be able to create images for their program code in Docker, run containers, or use Docker in GitHub Action. Today, we will talk about how to persistently manage data in Docker—the use of data volumes.
2 The Necessity of Data Management
People who first experience Docker may find that whenever we restart the container, the previous data will be lost, or feel that the data is difficult to transfer. This is because Docker's default settings will create all files in a readable container layer in a container. In other words, a container's data is independent and cannot be shared. To achieve data sharing and data migration, we need to use some methods to persistently manage data.
3 About Volumes
3.1 Advantages
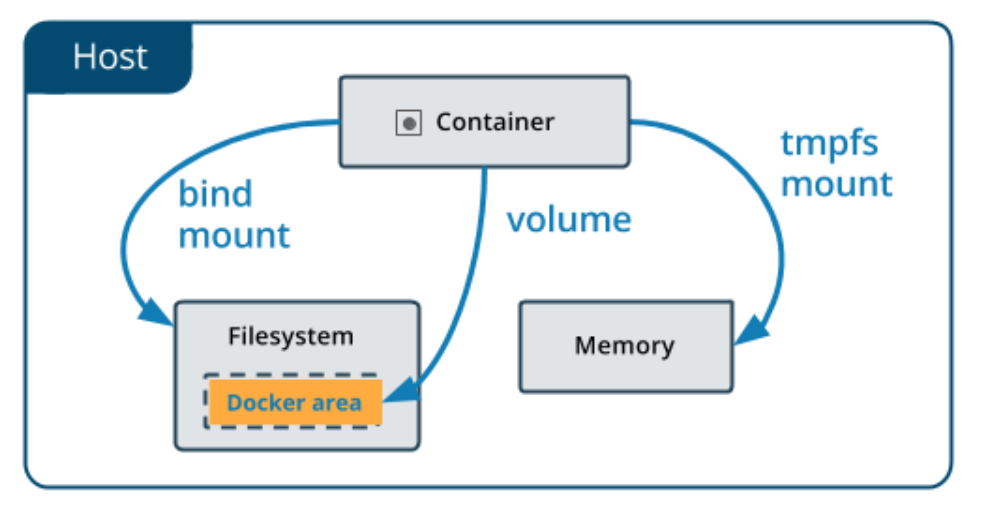
Volumes are a data management mechanism created and maintained by Docker. As shown in the figure below, its biggest feature is that it stores files in the Docker host, which is not accessible by other programs, and has high security when sharing data between different containers; and data backup and migration can be directly performed by Docker commands. In addition, Volumes performs better in Docker Desktop than other methods, which is also the recommended method by Docker official documents.
3.2 Common Operations on Volumes
Referencing to the official documentation, we introduce several use cases of Volumes under different circumstances.
-
We can create and manage Volumes using the following basic commands:
# Create a Volume and name it my-vol docker volume create my-vol # List all Volumes docker volume ls # View Volume properties docker volume inspect my-vol # Remove a Volume docker volume rm my-vol # Remove all Volumes docker volume prune -
Volumes can be specified when starting a container:
## Run devtest container ## And attach the container myvol2 to the /app directory docker run -d \ --name devtest \ -v myvol2:/app \ nginx:latest -
When building multi-container services, developers often choose
docker composeas a multi-container management tool and write thedocker-compose.ymlfile. On the one hand, this file can help us merge all container configuration parameters in a file for unified management. On the other hand, it can help the fast startup or termination of the multi-container service. Here we do not elaborate on each parameter of theymlfile, but focus on how to define Volumes in this file.
version: "3.9"
services:
  frontend:
    image: node:lts
    volumes:
      - myapp:/home/node/app
volumes:
  myapp:
    external: true
myapp, and the path is stored in /home/node/app. The second top-level Volumes setting is to enable the sharing of multiple containers, such as setting myapp to be shared by all containers. - Use container data that already exists to create Volumes for a new container. The new container is named
nginxtest, the new Volume is namednginx-vol, and the data source path is/usr/share/nginx/html.
 docker run -d \
  --name=nginxtest \
  -v nginx-vol:/usr/share/nginx/html \
  nginx:latest
On this basis, you can also add ro to set read-only permission, which can prevent others from accidentally deleting or other mistakes when sharing container data.
 docker run -d \
  --name=nginxtest \
  -v nginx-vol:/usr/share/nginx/html:ro \
  nginx:latest
- Volumes can also be used in scenarios such as data backup and migration.
First, we create a container named dbstore with the Volumes dbdata:
docker run -v /dbdata --name dbstore ubuntu /bin/bash
Secondly, backup the Volumes of this container. Use --volumes-from to specify the source of the container and specify dbdata to be backed up to the backup.tar file under the path /backup.
docker run --rm --volumes-from dbstore -v $(pwd):/backup ubuntu tar cvf /backup/backup.tar /dbdata
Next, migrate the container data that has been backed up. Create a new container dbstore2:
docker run -v /dbdata --name dbstore2 ubuntu /bin/bash
Finally, transfer the data from the backup.tar file to the new container:
docker run --rm --volumes-from dbstore2 -v $(pwd):/backup ubuntu bash -c "cd /dbdata && tar xvf /backup/backup.tar --strip 1"
4 Conclusion
When deploying services, developing functions is one aspect, and persistent management of data is also an essential part. This article hopes to help you choose the appropriate commands to manage the container's data when using Docker Volume.
Welcome everyone to leave a message for discussion!