使用TensorFlow进行图片分类
Info
作者:Vincent,发布于2022-05-23,阅读时间:约3分钟,微信公众号文章链接:
1 前言
本文将使用TensorFlow对多类别图片分类的任务进行讨论,主要内容包含图片数据的加载、数据增强、模型训练和迁移学习和TensorBoard的使用,所有的API均基于TensorFlow v2.8.0。以下代码在Google Colab里运行,因为Google提供了免费的GPU显著加快训练速度。
2 处理图片
加载包含目标有10类的原始图片数据。
import zipfile
import os
import matplotlib.pyplot as plt
import datetime


import tensorflow as tf
from tensorflow.keras.preprocessing.image import ImageDataGenerator
from tensorflow.python.ops.gen_array_ops import shape
from tensorflow.keras import layers


!wget https://storage.googleapis.com/ztm_tf_course/food_vision/10_food_classes_all_data.zip

# Unzip the downloaded file
zip_ref = zipfile.ZipFile("10_food_classes_all_data.zip", "r")
zip_ref.extractall()
zip_ref.close()

# 处理图片的函数
def load_and_process_image(file_name, img_shape=224):
  """
  Read an image and process it, reshape it to (img_shape, img_shape, color_channels)
  """
  # read the image
  img = tf.io.read_file(file_name)

  # decode the read file into a tensor
  img = tf.image.decode_image(img)

  # resize the image
  img = tf.image.resize(img, size=[img_shape, img_shape])

  # scale the image
  img = img/255.

  return img

# 显示文件
def list_files(startpath):
    for root, dirs, files in os.walk(startpath):
        level = root.replace(startpath, '').count(os.sep)
        indent = ' ' * 4 * (level)
        print('{}{}/'.format(indent, os.path.basename(root)))
        subindent = ' ' * 4 * (level + 1)
        for f in files:
            print('{}{}'.format(subindent, f))

# Walk through 10_food_classes directory and list number of files
for dirpath, dirnames, filenames in os.walk("10_food_classes_all_data"):
  print(f"There are {len(dirnames)} directories and {len(filenames)} images in '{dirpath}'.")
由输出可见,数据里有冰淇淋,牛排、披萨之类的图片。
There are 2 directories and 0 images in '10_food_classes_all_data'.
There are 10 directories and 0 images in '10_food_classes_all_data/test'.
There are 0 directories and 250 images in '10_food_classes_all_data/test/chicken_wings'.
There are 0 directories and 250 images in '10_food_classes_all_data/test/pizza'.
There are 0 directories and 250 images in '10_food_classes_all_data/test/grilled_salmon'.
There are 0 directories and 250 images in '10_food_classes_all_data/test/sushi'.
There are 0 directories and 250 images in '10_food_classes_all_data/test/fried_rice'.
There are 0 directories and 250 images in '10_food_classes_all_data/test/ice_cream'.
There are 0 directories and 250 images in '10_food_classes_all_data/test/chicken_curry'.
There are 0 directories and 250 images in '10_food_classes_all_data/test/hamburger'.
There are 0 directories and 250 images in '10_food_classes_all_data/test/ramen'.
There are 0 directories and 250 images in '10_food_classes_all_data/test/steak'.
There are 10 directories and 0 images in '10_food_classes_all_data/train'.
There are 0 directories and 750 images in '10_food_classes_all_data/train/chicken_wings'.
There are 0 directories and 750 images in '10_food_classes_all_data/train/pizza'.
There are 0 directories and 750 images in '10_food_classes_all_data/train/grilled_salmon'.
There are 0 directories and 750 images in '10_food_classes_all_data/train/sushi'.
There are 0 directories and 750 images in '10_food_classes_all_data/train/fried_rice'.
There are 0 directories and 750 images in '10_food_classes_all_data/train/ice_cream'.
There are 0 directories and 750 images in '10_food_classes_all_data/train/chicken_curry'.
There are 0 directories and 750 images in '10_food_classes_all_data/train/hamburger'.
There are 0 directories and 750 images in '10_food_classes_all_data/train/ramen'.
There are 0 directories and 750 images in '10_food_classes_all_data/train/steak'.
取出所有的标签:
class_names = os.listdir("10_food_classes_all_data/train/")
train_dir = "10_food_classes_all_data/train/"
test_dir = "10_food_classes_all_data/test/"
同时,使用TensorFlow的tensorflow.keras.preprocessing.image.ImageDataGenerator API对图片进行处理和增强,简而言之,该API能有效地根据文件目录自动为图片生成标签,并且按照设定的操作对图片进行增强。注意,数据增强只能用于训练集。
train_datagen_augmented = ImageDataGenerator(rescale=1/255.,
                                             rotation_range=20, #旋转图片
                                             shear_range=0.2, #剪切图片
                                             zoom_range=0.2, #缩放图片
                                             width_shift_range=0.2, #左右平移
                                             height_shift_range=0.2, #上下平移
                                             horizontal_flip=True) #左右翻转

train_datagen = ImageDataGenerator(rescale=1/255.)

test_datagen = ImageDataGenerator(rescale=1/255.)


# 生成数据集
train_data = train_datagen_augmented.flow_from_directory(train_dir,
                                                        target_size=(224,224),
                                                        batch_size=32,
                                                        shuffle=True)

test_data = test_datagen.flow_from_directory(test_dir,
                                              target_size=(224,224),
                                                batch_size=32
                                                 )
3 建模
3.1 基线模型
先做一个卷积神经网络作为基线模型:
# 绘制训练曲线
def plot_loss_curves(history):
  """
  Returns separate loss curves for training and validation metrics.
  """
  loss = history.history['loss']
  val_loss = history.history['val_loss']

  accuracy = history.history['accuracy']
  val_accuracy = history.history['val_accuracy']

  epochs = range(len(history.history['loss']))

  # Plot loss
  plt.plot(epochs, loss, label='training_loss')
  plt.plot(epochs, val_loss, label='val_loss')
  plt.title('Loss')
  plt.xlabel('Epochs')
  plt.legend()

  # Plot accuracy
  plt.figure()
  plt.plot(epochs, accuracy, label='training_accuracy')
  plt.plot(epochs, val_accuracy, label='val_accuracy')
  plt.title('Accuracy')
  plt.xlabel('Epochs')
  plt.legend()


# 建模
tf.random.set_seed(42)
tf.keras.backend.clear_session()

cnn_model = tf.keras.models.Sequential([
    layers.Conv2D(filters=10, kernel_size=(3,3), activation="relu",
                  input_shape=(224, 224, 3)),
    layers.MaxPooling2D(pool_size=2),

      layers.Conv2D(filters=10, kernel_size=(3,3), activation="relu"),
    layers.MaxPooling2D(pool_size=2),

    layers.Flatten(),
    layers.Dropout(0.5),
    layers.Dense(10, activation="softmax")
])

cnn_model.compile(loss=tf.keras.losses.CategoricalCrossentropy(),
                optimizer=tf.keras.optimizers.Adam(),
                  steps_per_execution = 50,
                    metrics="accuracy")


def create_tensorboard_callback(dir_name, experiment_name):
  log_dir = dir_name + "/" + experiment_name + "/" + datetime.datetime.now().strftime("%Y%m%d-%H%M%S")
  tensorboard_callback = tf.keras.callbacks.TensorBoard(log_dir=log_dir)
  print(f"Saving tensorboard callback log file to {log_dir}")
  return tensorboard_callback


tf_board_callback =  create_tensorboard_callback(dir_name="vision_model",
                                                 experiment_name="VGG_base")

history_cnn = cnn_model.fit(train_data,
            steps_per_epoch=len(train_data),
            epochs=5,
              validation_data=test_data,
              validation_steps=len(test_data),
              callbacks=[tf_board_callback])

cnn_model.evaluate(test_data)
输出如下,准确率差强人意:
79/79 [==============================] - 12s 148ms/step - loss: 1.8068 - accuracy: 0.3852
[1.8068159818649292, 0.38519999384880066]
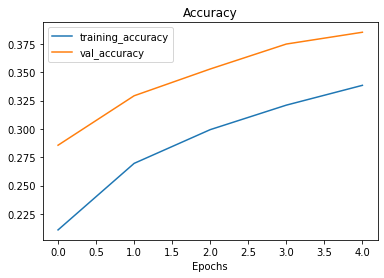
查看训练过程,可以发现曲线趋势是正常的,如果加深模型、或者训练更长的时间应该能达到更好的精度。
plot_loss_curves(history_cnn)

3.2 迁移学习
另外一个提升模型性能的角度是使用迁移学习。迁移学习将使用在其他任务上已经表现得非常好的模型,将其应用在自己的任务上,通常来说相比于从零建立一个模型表现要更好,因为其模型架构和训练过程都做了很多的优化。此处使用层数非常深同时性能非常好的Xception模型。
# 加载预训练的Xception模型
base_model = tf.keras.applications.xception.Xception(weights='imagenet', include_top=False)
avg = tf.keras.layers.GlobalAveragePooling2D()(base_model.output)
output = tf.keras.layers.Dense(len(class_names), activation='softmax')(avg)
model = tf.keras.Model(inputs=base_model.input, outputs=output)

# 通常会冻结预训练模型的权重,因为他们经过了良好的训练,已经在优化状态了
for layer in base_model.layers:
    layer.trainable = False

optimizer = tf.keras.optimizers.SGD(lr=0.2, momentum=0.9, decay=0.01)
model.compile(loss='categorical_crossentropy', optimizer=optimizer, metrics=['accuracy'])

epochs = 5
tf_board_callback_2 =  create_tensorboard_callback(dir_name="vision_model",
                                                 experiment_name="Xception")

history = model.fit(train_data, epochs=epochs, validation_data=test_data,
                    callbacks=[tf_board_callback_2])

model.evaluate(test_data)
输出如下,性能甩了基线几条街:
79/79 [==============================] - 31s 390ms/step - loss: 0.5771 - accuracy: 0.8388
[0.5770677924156189, 0.8388000130653381]
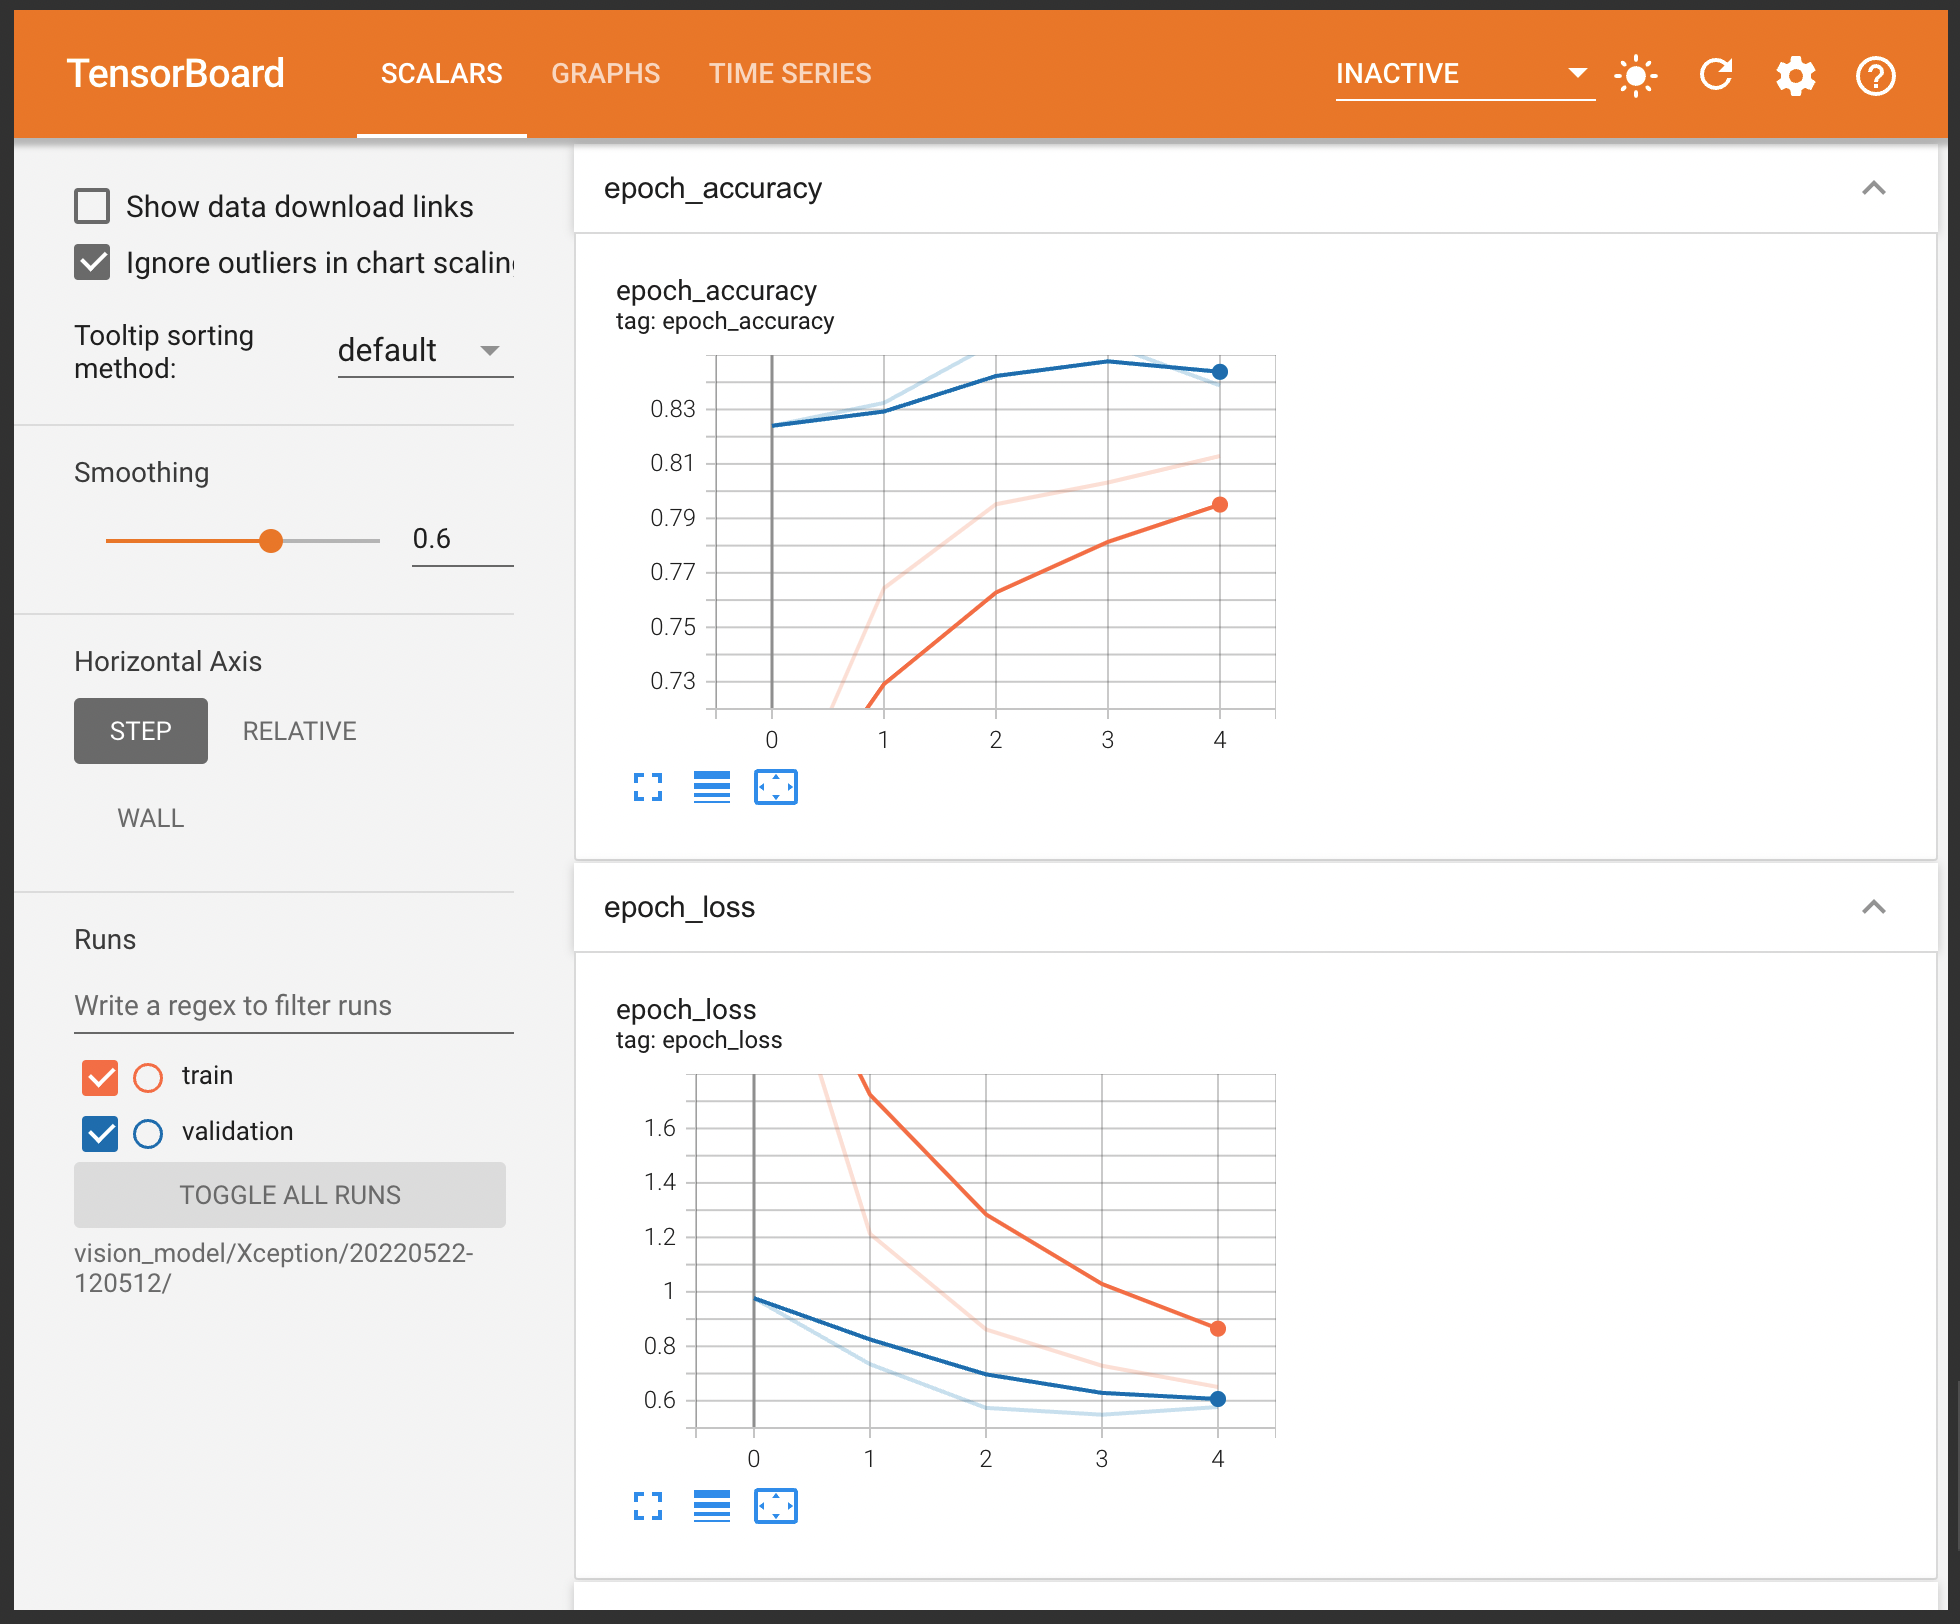
在TensorBoard里查看训练过程:
# 以下命令仅适用于Google Colab
%load_ext tensorboard
%tensorboard --logdir="vision_model/Xception/20220522-120512/"
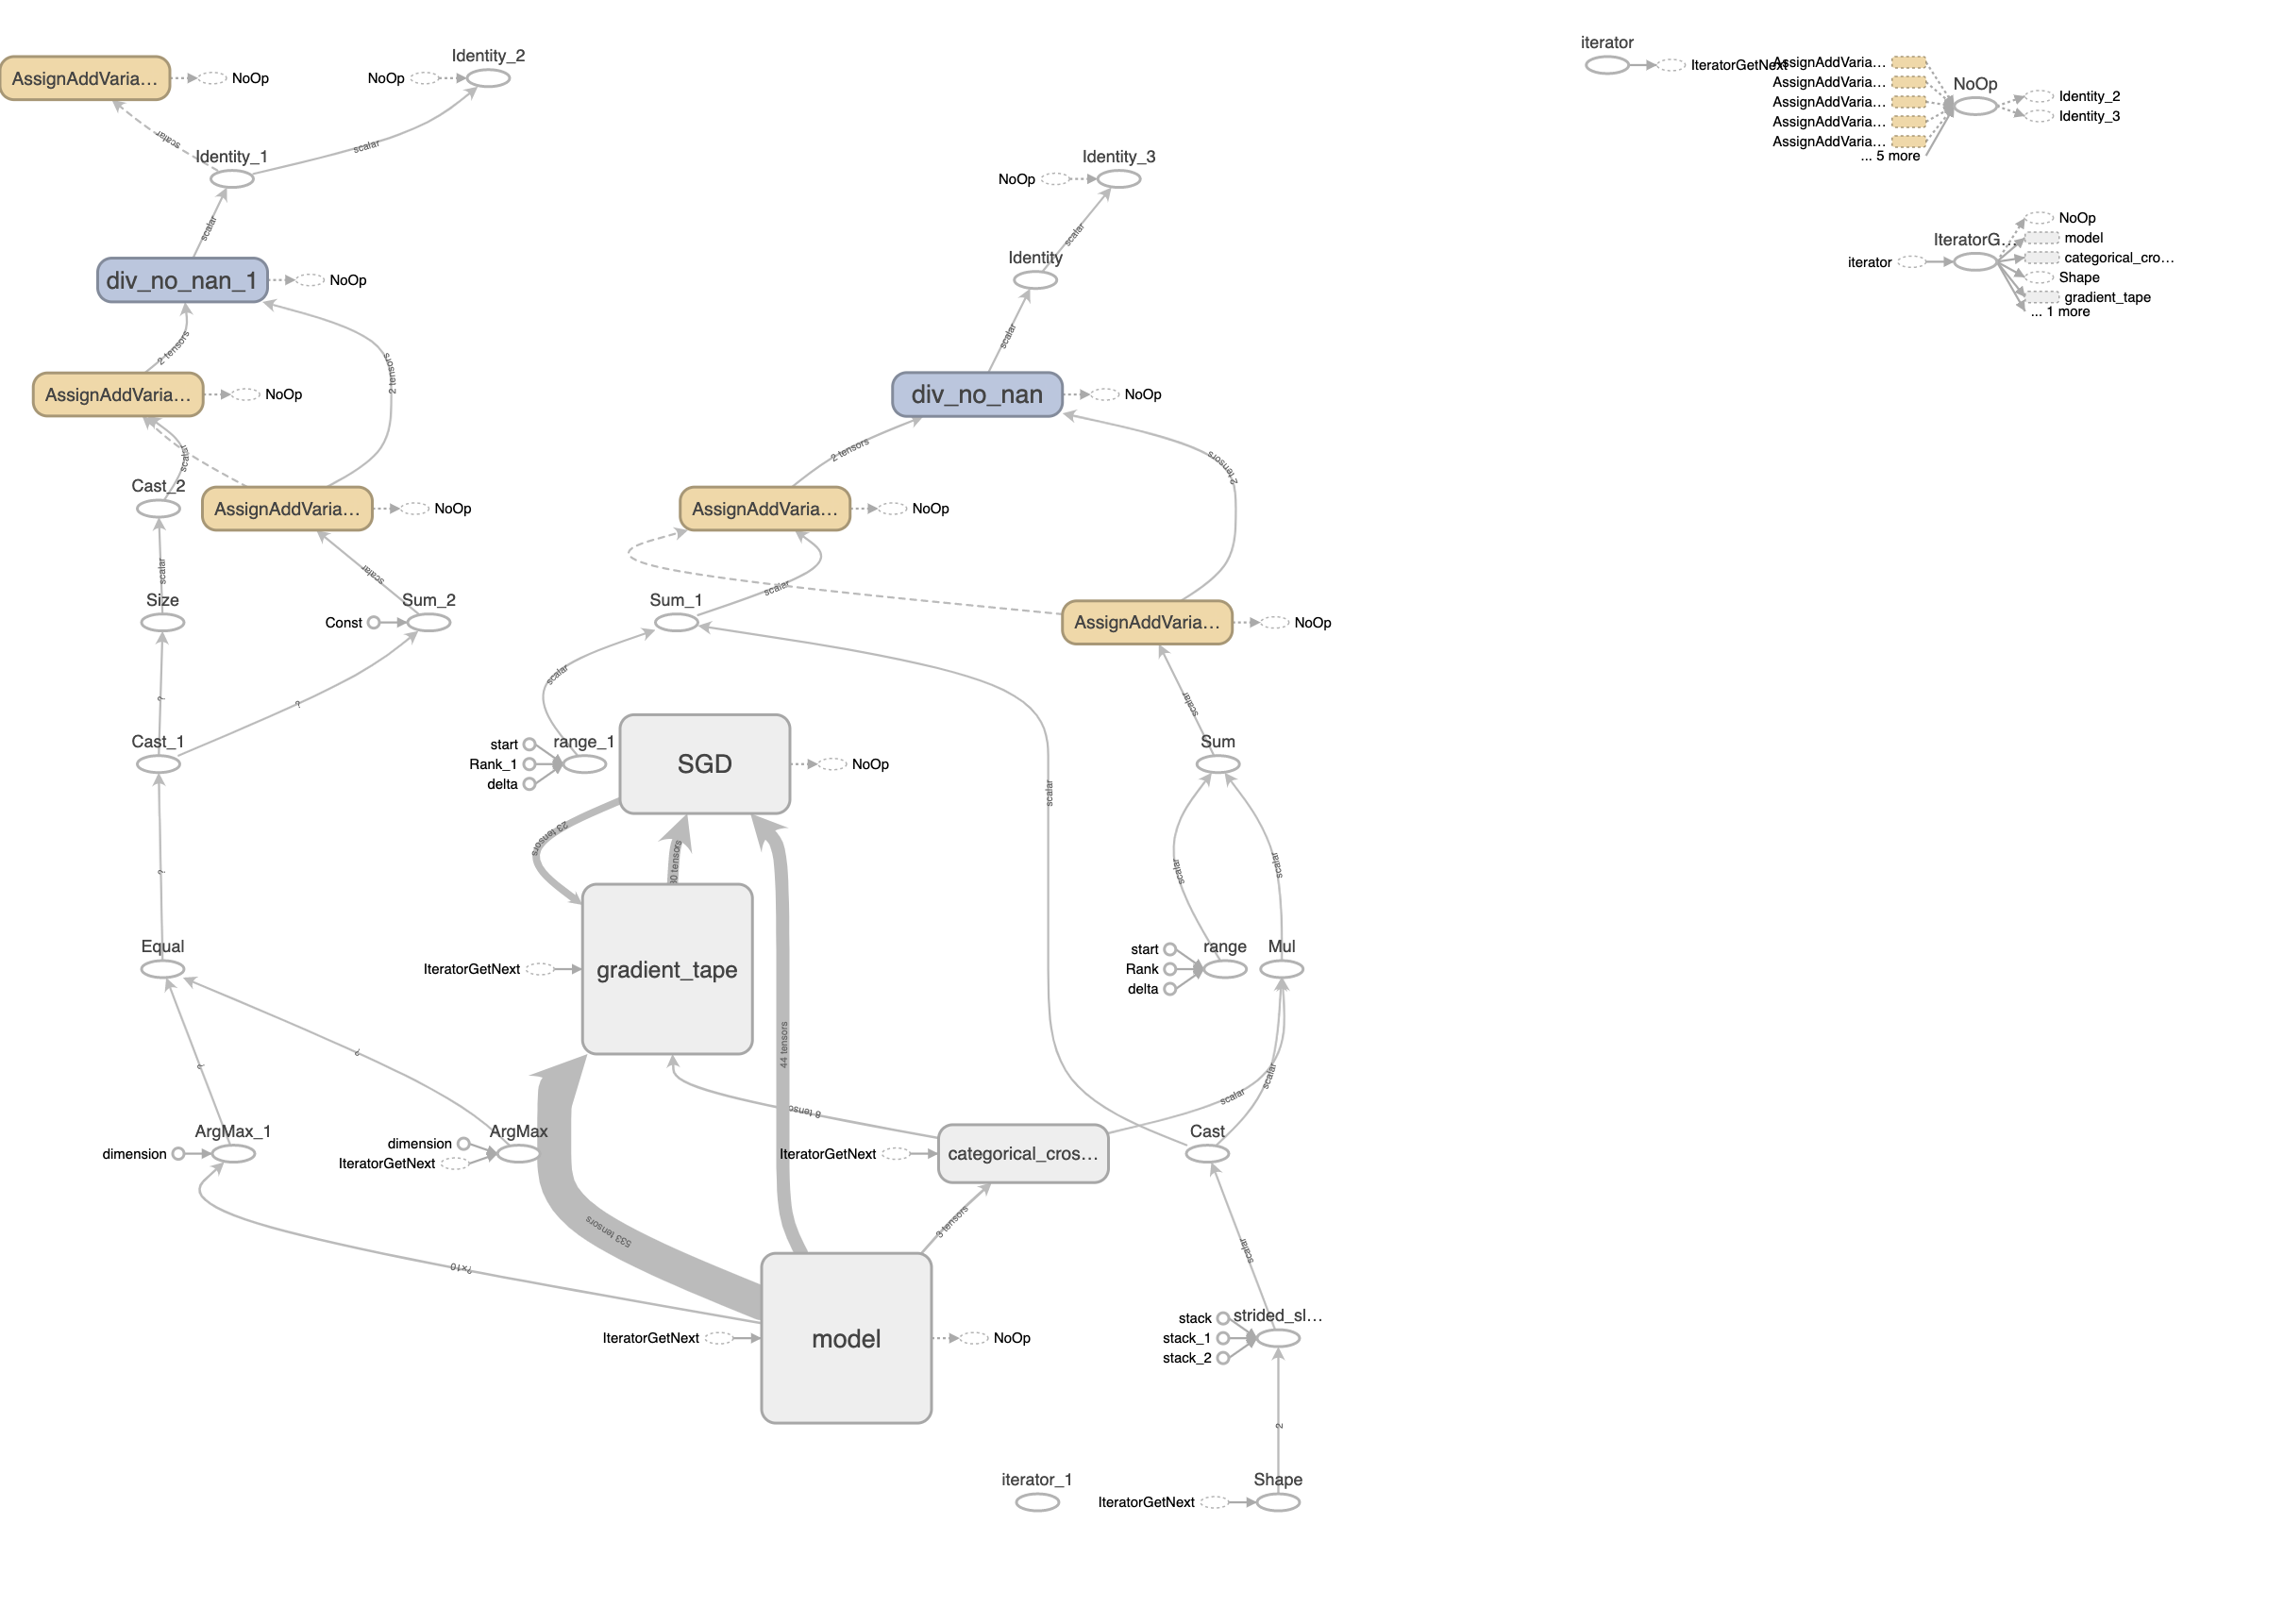
同时可以在TensorBoard里下载模型的计算图,可见Xception远比基线模型复杂,因此它的性能远超基线也不足为奇。
4 总结
本文涵盖了使用神经网络进行图片分类任务里的重要概念和TensorFlow相关的重要API,如tensorflow.keras.preprocessing.image.ImageDataGenerator, TensorBoard Callback和如何加载预训练模型。希望这次的分享对你有帮助,欢迎在评论区留言讨论!
%20-%20Tail%20Pic.png)